Friday 26 November 2010

consumable gifts {part 2: handmade and edible - the sweet ones}

Hello and welcome to the 2nd part of this Consumable Gifts series.

In this post, I've compiled a list of consumable gifts ideas, focusing on (you probably guessed from the title) gifts that are both handmade and edible. I haven't included cookie and cake recipes because you can find those for yourselves. Also, think about when you're giving the gift: will the recipient have time to consume it before it's past its best? Maybe they already have a cupboard full of cake and one more would just be a burden. Unless it's freezable, maybe? This is why I've chosen things in these posts which will keep a bit longer.

We begin with homemade food gifts {the sweet ones}. I got quite hungry creating this post.

1. Fudge
Make batches of different flavours: peanut butter fudge, chocolate fudge, vanilla fudge, chocolate mint fudge, irish cream fudge, holiday fudge, or just plain and simple fudge (more ideas and recipes here). Slice it, wrap up in greaseproof paper, put it in a box and tie with ribbon or bakers' twine - more ideas for packaging here.

2. Mix in a Jar
Layer a simple mix for cookies/biscuits/brownies into a nice jar (the jar can be part of the gift too). All they then have to do is add the wet ingredients. Attach the recipe to a card and tie with ribbon.

(image from Fried Chillies)

[For ideas on how to decorate something in a jar, check back here later for a post on packaging ideas]

3. Cookie Dough
Wrap up a log of dough for them to keep in their freezer and bake with when ready. It doesn't go stale and is something a bit different. See here.

4. Brittle
Good old fashioned peanut brittle is my favourite. See here for more ideas and recipes. You could wrap it unbroken, with a mini hammer and ribbon, like this one.

5. Candied Citrus Peels
See here.

6. Gingerbread Caramels
I love the packaging for this.

7. Fleur de Sel Toffee
See here.

8. Cake in a Jar
It keeps! It can be stored for 6 months, possibly longer. No cooking required for the recipient: just open and eat. Find it here.

(image from The Kitchn)

9. Chocolate Drizzled Mints
Looks fun to make, too.

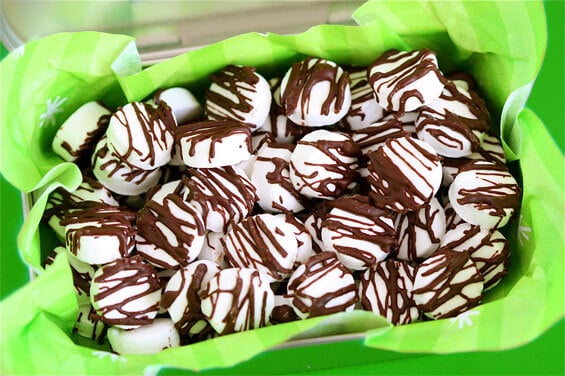
(image from Gimme Some Oven)

10. Truffles
Autumn Spice Truffles, Chocolate Truffles, Amaretto Truffles, Chocolate Peanut Butter Truffles, Low-Fat Mint Truffles. Dip them in chocolate and sprinkle white chocolate shavings or nuts before the chocolate sets, top them with bubble wrap chocolate decorations, or just leave them as they are.

11. Peppermint Creams
From Hugh Fearnley-Whittingstall, no less.

12. Homemade Marshmallows
Candy-Cane Marshmallows and Marshmallow Snowflakes look great in hot chocolate.

13. Edible Glitter (aka Sanding Sugar)
You chefs may be wincing when I call this edible glitter but, to a novice, that's kind of what it looks like, don't you think? It's actually Sanding Sugar, though.

(image from Bake at 350)

14. Neapolitan Coconut Strips
They even have packaging tips here.

15. Caramel Bourbon Vanilla Sauce
Pour into a little jar and attach a spoon with garden twine. Beautiful.

16. Candy Bracelet/Necklace
A great gift for children who don't have a problem with E-numbers. Or just big kids who don't care about E-numbers.

(image from Paper&Cake)

17. Hot Fudge Sauce
This looks great. On profiteroles, perhaps?

18. Cinder Toffee/Honeycomb/Sponge Candy
As it is, or dipped in chocolate.

19. Buttermilk Syrup
Put it in a bottle and stick a label on. Maybe you could give waffles with it? I'd like that.

20. Hazelnut Chocolate Spread
Homemade tastes so much better than Nutella.

21. Gumdrop Pops
Not quite homemade, but they are home-assembled. It certainly makes sweets look even more exciting.

22. Pecan Clusters
These look great in their handmade packaging.

23. Vanilla Syrup
Great gift for a coffee lover. I prefer it in hot chocolate. This recipe is really simple.

(image from Craftzine)

24. Praline Ice-Cream Sauce
This one's made in the microwave - great!

25. Brandy Butter
This one looks especially pleasing with a spoon attached with bakers' twine.


Coming up next: homemade food gifts {the savoury ones}

Wednesday 24 November 2010

Christmas Mini Fair


A bit short notice but if you do happen to be in Bristol this weekend, it would be great to see you there. A Christmas Fair opposite Christmas Street - brilliant!

consumable gifts {part 1:the preamble}

After a recent de-cluttering, I was reminded that we have far too much stuff. We spend time and money accumulating stuff. We then spend time and money housing the stuff and cleaning the dust off the stuff.

Inspired by a blog called 365 Less Things (I know. It should be 'fewer', not 'less'. But the content is excellent so I can forgive them), I became more ruthless in my de-cluttering (I still have a long long way to go. I'll never be a minimalist, but my clutter had reached the 'unmanageable' stage, so immediate action was required.). It did get me thinking about gifts though. Some of the things I was getting rid of were gifts and, until recently, I had kept many things out of guilt.

A friend of mine made an interesting point: how often do you go to someone's house and look around for the gift you gave them three Christmases ago? (The answer to that rhetorical question should be 'never' for this argument to work) Then there are these conversations:

Random friend: Hey look!
Me: What?
Random friend: The dog* statue!
Me: Um...
Random friend: You got it for me! Remember?
Me: ...Did I?
Random friend: Yeah! I love it! You got it for me 5 years ago when you went on holiday.
Me: Are you sure that was...
Random friend: Yeah! It must have been you. I think it was you. Well anyway, I love it! I always keep it on that shelf.
Me: Great!

You must have had one of those conversations before.

That thinking helped me to get rid of things I had been keeping (just because they were gifts) even though I no longer wanted/needed/liked them. Remember: the people giving the gifts really care about you. So, that photo frame blessed you for 5 years - great! Don't hang onto it just because you feel you should. Some things are good for a time. Just because you're getting rid of it now, it doesn't mean you never liked it. Tastes change, fashions change, needs change. Get rid of it and get over it.

This then led me to think about the gifts I'm giving. I don't want to give someone something which will add to the clutter and end up in landfill. I'd rather they had something they'd really use and/or use-up.

Can you see where I'm going with this?

Consumable gifts!

One Christmas, a friend of ours made fudge as a gift to us. Not only was it great fudge but it was gone within a month, so no extra clutter in our home. She enjoyed making it (I hope) and we enjoyed eating it.

That got me thinking (you can tell I've been doing a lot of thinking in this blog post**. It happens about once a year. Don't get used to it.) about other handmade consumable gifts. I've compiled a list and I will very kindly share that list with you. I'm nice like that.

So, part 2 in the consumable gifts series will be the handmade gifts (I thought I'd share that list first so that you actually have enough time to make these things before Christmas).

For now, I will leave you with a picture of some sock cupcakes (why not?).


*I would never every buy someone a statue of a dog.
** I tried to condense my long, rambling thoughts on the topic into one blog post (this one), which is why it may seem a bit disjointed. Sorry about that. I just thought you'd like to know where this sudden drive for de-cluttering and consumable gifts came from.

Saturday 20 November 2010

DIY baby shower clothesline bunting

So, you'd like to make some clothesline bunting for a baby shower? You've come to the right place.

What you'll need:
Paper
Scissors
A pencil
String
Mini wooden clothes pegs

1. Choose a colour scheme. 

This baby shower was for a baby boy (well, the party itself was for the mother, but she was expecting a boy) so I chose some patterned paper which would work for a baby boy colour scheme and used those colours: blue, green and orange.

[Tip: by choosing the colours within a patterned paper, you don't have to think so hard about whether your colours will work with each other or not. It's a lazy way of picking a colour scheme, but it works.]


2. Once you've got your colour scheme and chosen your papers, you'll need a template to draw around. I've uploaded a PDF here which you can download and print. Cut your template out of card so that it is sturdy enough to draw around.


3. Draw around your templates on the back of the patterned paper. I went with bodysuits, bibs and nappies (diapers). I chose to stick to white nappies to break up the colour a bit. But you can do whatever you like - it's your bunting.


4. Cut out your shapes.

5. When at the baby shower venue, put up the string.

6. Once it's secure, arrange your paper shapes and attach them with mini wooden pegs.


7. Stand back and admire your handiwork.


This is so simple to make and so pleasing to look at and it could easily be used at future baby showers. It would be really straightforward to adapt the colour scheme.

This has got me thinking about the next baby shower, which will be after Christmas. That shower is also for a boy but I'm trying to think of a completely different colour scheme (all ideas welcome)...

Hope you're having a great weekend,

Pips :)

Thursday 18 November 2010

gifts for camera lovers

If you thought that Hüfa was a great gift for a photographer (and it is. Mine has stopped me from losing my lens cap about 5 times today), you should have a look at Photojojo. It's a treasure trove!

Some of my faves:


Camera phone lenses! This would be very cool if I had a fancy phone.


Mr Pippa got really excited about this one. It is only a model camera though, so your borrower friends couldn't even use it.


If I was one for sticking things to my MacBook, this would be cool. You can even choose between Canon and Nikon.

And now for things I'd actually use:


Not of much interest if you're not into photography, but very handy: a white balance lens cap. No more carrying around a bit of white paper. It replaces your lens cap so there's nothing extra to carry. Although, the auto white balance in Lightroom is so impressive that I can live without this for a while longer.


Magnetic polaroid frames. Super fun!


Super-Secret Spy Lens! This is genius. What I love about my Nikon D5000 (I had to check the body before I typed that. I never remember. Why don't they have them in some kind of order like, say, after 80 comes 90? No, that would be far too logical. So what comes after the D5000? No, it's not a D5001 - that could be a bit silly. It's not a D5500. It's not even a D6000. It's a D90. Where's the logic in that?! Anyway, where was I? Oh I remember...) is the flip out screen on the back (excuse the lack of technical terminology). It's what stopped me from upgrading from the Fuji sooner - I didn't want to lose the flip out screen with live view. Why? Because some of my favourite photos of people were taken with the camera nowhere near my face with the screen flipped out. Why are those photos often my favourites? Because no-one is posing and I'm able to catch the real smiles and laughter. However, sometimes, I want to look through the viewfinder. But you know that as soon as someone has a camera pointed at them, they stop the laughing and start looking all awkward. Well, not always, obviously. And not everyone, clearly, or we wouldn't have people making a living out of being models. Back to my original point: this is brilliant and I'd love to try it out. (Photojojo: fancy lending me one?)\


Cloak Camera Bag. Not as subtle as the Super-Secret Spy Lens, but still brilliant. I've been looking for a camera bag where I don't actually have to remove the camera to use it (yes, technically I don't have to remove my camera from the Crumpler bag to use it if I only want photos of the inside of the bag). I like this camera bag so much, it's getting another picture:


And finally, we have my favourite. This is the one which made Mr Pippa and me gasp in wonder and delight...


The Camera Lens Mug. 


You can even choose between a Canon and a Nikon lens. I love it.

Wednesday 17 November 2010

baby shower decorations

I can tell you're on the edge of your seat to see what this blog post will be about. Is it about tiny decorations for my shower? Or decorations for my tiny shower? Or decorations for the shower I use only on my baby? It may or may not surprise you to know that I'm actually talking about decorations for a baby shower (one of those parties thrown for a woman expecting her first child).

I made various decorations for this shower and we'll get to each one of them in time but first I thought I'd show you the simplest (no special skills or fancy equipment required): clothesline bunting.


Isn't it cute?

I'll have a tutorial on here soon. I'm working on a few things atm so it may end up being quite a busy couple of months over here on Pippa's Long Stockings. Makes a change.

PS. I added some buttons (clickable links*) over on the right (finally doing something with what I was taught on the course over at Little Light Studio. I'd recommend it, y'know) and I'm working on some other bits and bobs. So if you, y'know, happened to mention how great they look... that would be nice. We'll pretend I haven't said this though. You noticed all by yourself without any prompting from me. [Insert massive subtle wink here.]

*Mr Pippa ordered me to add that. He thought I'd stuck some buttons to the bunting.

Tuesday 16 November 2010

new blog banner

I have a new look! No, it's not a hair cut. Look again. No, I haven't had my nails done*. It's my blog! I've changed the banner and the font. What do you mean you didn't notice? Was the post title not a big enough hint?!


I have a dreadful time trying to choose fonts. (It's a hard life.) It was one of those "Unless you just settle on something, anything, then you'll have nothing". So, I stopped comparing (inspired by the quote below, found here) and just went with this one.


In past couple of hours of fiddling about with it, it's really grown on me. The font I finally went with reminds me of the ladybird books I read as a child. The books were aptly named 'Read It Yourself'.

I was the second child.

You know what I'm saying.

*I haven't painted my nails since I was a teenager. 
**My mum has since apologised for not reading to me as a child.

Sunday 14 November 2010

lens cap issues


I really like my Nikon (no it's not the name of my dog, it's a camera. I don't have a dog. But, if I did, I'd call him Spartacus or something). It's a joy to use (we're back to the camera now) and I'm very happy with the results it gives me. There's just one problem with it: the lens cap. Well, the lens cap itself works fine, but there's no way of attaching it to the camera. Surely I can't be the only person who finds this a problem? With my previous camera, there were a couple of teeny tiny holes on the outside of the lens cap and a dainty little strap thing looped through, attached to the camaera strap. Yes, the camaera strap. It's a new spelling you may not have seen before. ANYWAY, having the lens cap attached to the camera meant that I could just whip it off and snap away, without a care in the world. But now, I have to actually hang on to the silly thing while I'm snapping. The kind people at Hüfa heard of my lens cap plight and sent me this lens cap holder:


Thank you very much, Hüfa. Tell me: is it pronounced hoo-fa? Or is it just a strange decorative thing?


Thank you also for the diagram on how to use the Hüfa holder. I might have ended up attaching it to my leg or something.


The hüfa, ready for use.


The hüfa, attached to the camera strap. (I realise the diagram shows the hüfa on the wider part of the strap, but it was easier to photograph like this.)


Ooo. The hüfa holding the lens cap. Clever little hüfa.


So, I am presently testing out the little lens cap holder. It's good. I haven't had a chance to properly test it out yet, so I'll do a follow-up post when I have more to say about it.

So, how are you? It's been a while. Have I missed much? Sorry, what was that? You'd like to see pictures of the baby shower decorations I made? Oh alright then. That'll be the next post.


Do you have any idea how difficult it was to photograph the hüfa on the strap?! First, there was the holding-a-mirror-above-the-camera thing, then there was the problem of holding the mirror still, then there was the issue of focusing on the hüfa, which can be a struggle in a mirror which needs dusting, as the camera would much rather focus on the dust (see below).


Obviously, if I had known how grubby the mirror was, I might have given it a clean before the little photography session.